Kubernetes has proven itself in recent years and is no longer a tech trend. A lot of application developers are hosting their applications on containers with Kubernetes.
It is of course a good solution to build an application as a multi-tier app. The nice thing about it is that such a pod (an environment in which one or more containers or virtual machines can run) has a desired state which the system tries to reach. In simple words, this means that if a pod should, for example, always be running with specification XY and an underlying node crashes, then the Kubernetes master immediately ensures that this pod is created again on another available node.
Meanwhile, it is even possible to deploy virtual machines in Kubernetes. This is done with the help of KubeVirt. Technically, this does not make anything new; it uses the well-known KVM virtualization layer of Linux, but KubeVirt integrates this into Kubernetes. If you don’t have any experience with Kubernetes and want to get some hands-on experience without using the Kubernetes environments from the bigger cloud players like GKE (from Google) or EKS (from Amazon), I describe in this blog post how to set up your own self-hosted Kubernetes cluster. The final setup consists of a Kubernetes Master/Worker1 node and a second Worker2 node.
If you don’t want to connect to the Master node directly in order to administrate the cluster, I’ll show you how you can install the Kubernetes administrative tools on your local machine to administrate it. The final setup should look like this:
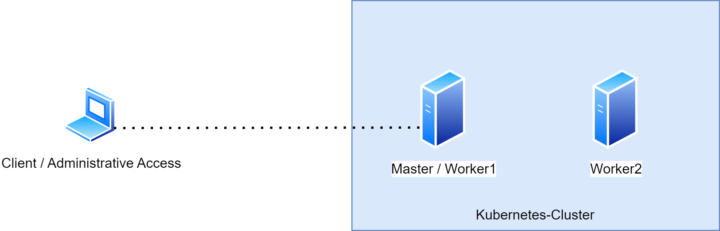
The base of the setup
For this setup, I am using two Ubuntu server 22.04 virtual machines as hosts for the Kubernetes Master and Worker nodes. These are already configured and set up and all updates are installed.
You can download your own copy of Ubuntu server 22.04 here: ubuntu.com/download/server
For transparency of the setup, the IP addresses of my machines are:
| Master / Worker1 | 172.16.40.10 |
| Worker2 | 172.16.40.11 |
The choice of a Kubernetes provider
Kubernetes can be installed in many ways. The hardest way is to install all the components needed for a Kubernetes environment individually and by hand. Since this is not very easy or beginner-friendly, there are also providers for self-hosted Kubernetes, which provide a whole, simplified installation in a smaller setup procedure.
Personally, I used to work with Rancher’s RKE2 all the time. But I must say from my own experience that I am more convinced by Kubespray. Both are Kubernetes distributions, but I’ve noticed that Kubespray brings more updates and the available CNIs are in a more current version, which could play an important role for many.
For those who don’t know what a CNI is, here is a brief description:
—
A Container Network Interface (CNI) is a framework for dynamically configuring networking resources. It uses a group of libraries and specifications written in Go. The plugin specification defines an interface for configuring the network, provisioning IP addresses, and maintaining connectivity with multiple hosts. Simply said, it is responsible for Kubernetes internal network communication.
The most popular CNI plugins are Cilium, Calico, and Flannel, but there are many more and you can use the one you want.
—
Kubespray uses Ansible to install all necessary components for the Kubernetes cluster. Ansible is an open-source automation tool for orchestration and general configuration and administration of computers. It combines software distribution, ad hoc command execution, and software configuration management.
Installation of the Kubernetes cluster
We are now at the point where we can install the Kubernetes cluster. I am connected via SSH with putty to my Master Node/Host named kube-ava-master.
All of the following installation steps can be found in more detail on the Kubespray website.
Create SSH keys
In order for the Anisble script to perform the setup, it must be able to connect to all hosts. To do this, we create an SSH key, which is then stored on all hosts as authorized keys.
tecbite@kube-ava-master:~$ sudo ssh-keygen -t rsa -b 4096
Enter through all inputs.
tecbite@kube-ava-master:~$ sudo cat /root/.ssh/id_rsa.pub
Public Key displayed.
Copy this public key to all hosts in the file /root/.ssh/authorized_keys.
Change to root
According to the Kubespray documentation, the installation should be done as root. Therefore, we change it to root.
tecbite@kube-ava-master:~$ sudo su
root@kube-ava-master:/home/tecbite#
Install dependencies for Ansible
To run Ansible, we need to install some dependencies.
root@kube-ava-master:/home/tecbite# sudo apt install python3-pip -y
root@kube-ava-master:/home/tecbite# sudo apt install python3-virtualenv -y
Kubespray configuration and installation
Clone the Kubespray repository to the master Node:
root@kube-ava-master:/home/tecbite# git clone https://github.com/kubernetes-sigs/kubespray.git
Set up the python environment and install Ansible.
root@kube-ava-master:/home/tecbite# VENVDIR=kubespray-venv
root@kube-ava-master:/home/tecbite# KUBESPRAYDIR=kubespray
root@kube-ava-master:/home/tecbite# ANSIBLE_VERSION=2.12
root@kube-ava-master:/home/tecbite# virtualenv  --python=$(which python3) $VENVDIR
root@kube-ava-master:/home/tecbite# source $VENVDIR/bin/activate
(kubespray-venv) root@kube-ava-master:/home/tecbite# cd $KUBESPRAYDIR
(kubespray-venv) root@kube-ava-master:/home/tecbite/kubespray# pip install -U -r requirements-$ANSIBLE_VERSION.txt
The repository comes with a sample Ansible inventory, which will now be copied so we can edit it for our needs.
Copy “inventory/sample” as “inventory/mycluster.”
(kubespray-venv) tecbite@kube-ava-master:~/kubespray$ cp -rfp inventory/sample inventory/mycluster
Update the Ansible inventory file with inventory builder. We will declare the IPs from our master and worker nodes as a variable, which will then be used to fill in all configuration files automatically.
(kubespray-venv) root@kube-ava-master:/home/tecbite/kubespray# declare -a IPS=(172.16.40.10 172.16.40.11)
(kubespray-venv) root@kube-ava-master:/home/tecbite/kubespray# CONFIG_FILE=inventory/mycluster/hosts.yaml python3 contrib/inventory_builder/inventory.py ${IPS[@]}
Now we are at the step where we define which CNI should be installed. For that, we will edit the cluster configuration file:
(kubespray-venv) root@kube-ava-master:/home/tecbite/kubespray# vi inventory/mycluster/group_vars/k8s_cluster/k8s-cluster.yml
# Choose the network plugin (cilium, calico, kube-ovn, weave, or flannel. Use cni for generic cni plugin).
# Can also be set to “cloud,” which lets the cloud provider set up appropriate routing
kube_network_plugin: calico
Everything is now configured, and we are good to go. If you want, you can check the configuration files again:
cat inventory/mycluster/hosts.yaml
cat inventory/mycluster/group_vars/all/all.yml
cat inventory/mycluster/group_vars/k8s_cluster/k8s-cluster.yml
Otherwise, we can finally run the Ansible script to install Kubernetes:
(kubespray-venv) root@kube-ava-master:/home/tecbite/kubespray# ansible-playbook -i inventory/mycluster/hosts.yaml --become --become-user=root cluster.yml
Depending on the performance of your hosts, the installation can take from 10 to 20 minutes!
Once the installation is done and the Ansible script has run, we can check our cluster status and the pods by running the following command:
(kubespray-venv) root@kube-ava-master:/home/tecbite/kubespray# kubectl get pods -A
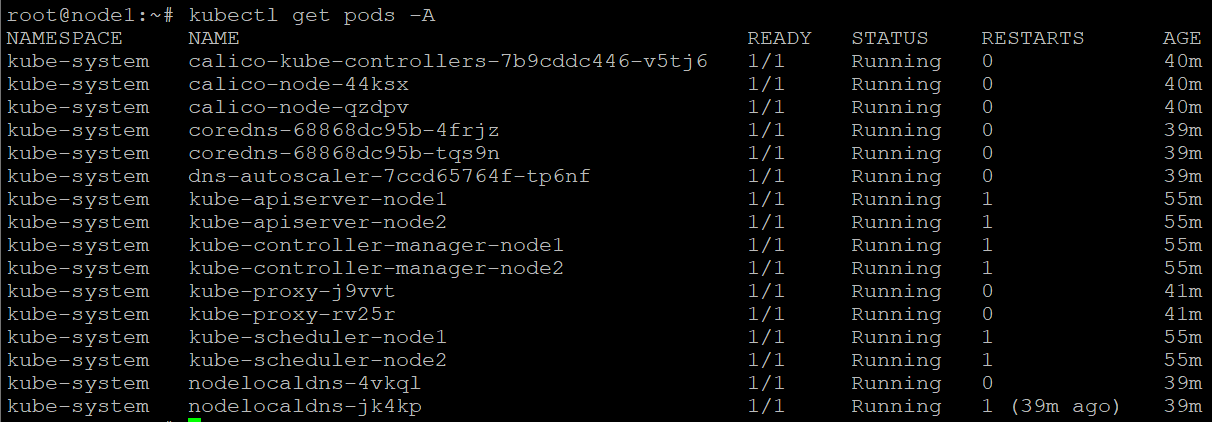
For those who are using Kubernetes for the first time, these pods are used by the Kubernetes system itself to run and manage everything.
We can also quickly check that both nodes are ready:
(kubespray-venv) root@kube-ava-master:/home/tecbite/kubespray# kubectl get nodes -A

We are now at the end of the Kubernetes cluster installation.
Install kubeadm on a management computer
If we don’t want to connect via SSH to the master node in order to manage the cluster and the pods, we can install the kubeadm command line tool on other computers:
kubernetes.io/docs/setup/production-environment/tools/kubeadm/install-kubeadm/
For this demonstration, I will install it on my WSL on my laptop.
Simply run the following commands:
tecbite@kube-ava-client:~$ sudo apt-get update
tecbite@kube-ava-client:~$ sudo apt-get install -y apt-transport-https ca-certificates curl
tecbite@kube-ava-client:~$ sudo curl -fsSLo /etc/apt/keyrings/kubernetes-archive-keyring.gpg https://packages.cloud.google.com/apt/doc/apt-key.gpg
tecbite@kube-ava-client:~$ echo "deb [signed-by=/etc/apt/keyrings/kubernetes-archive-keyring.gpg] https://apt.kubernetes.io/ kubernetes-xenial main" | sudo tee /etc/apt/sources.list.d/kubernetes.list

tecbite@kube-ava-client:~$ sudo apt-get update
tecbite@kube-ava-client:~$ sudo apt-get install -y kubelet kubeadm kubectl
Now we need to copy the configuration of the Master node to our client.
First, create a new folder in the home directory:
tecbite@kube-ava-client:~$ mkdir .kube
tecbite@kube-ava-client:~$ cd .kube
Make a new, empty config file:
tecbite@kube-ava-client:~$ touch config
Now log in again to the Master node and execute the following command:
(kubespray-venv) root@kube-ava-master:/home/tecbite/kubespray# cat /root/.kube/config
This will output the entire config file with the certificate and access keys.
Copy the whole output to the previously created empty config file on the client.
tecbite@kube-ava-client:~$ vi config
Important: Edit the server IP to the IP of your master node:
…
server: https://172.16.40.10:6443 #Change to your master IP
name: cluster.local
contexts:
…
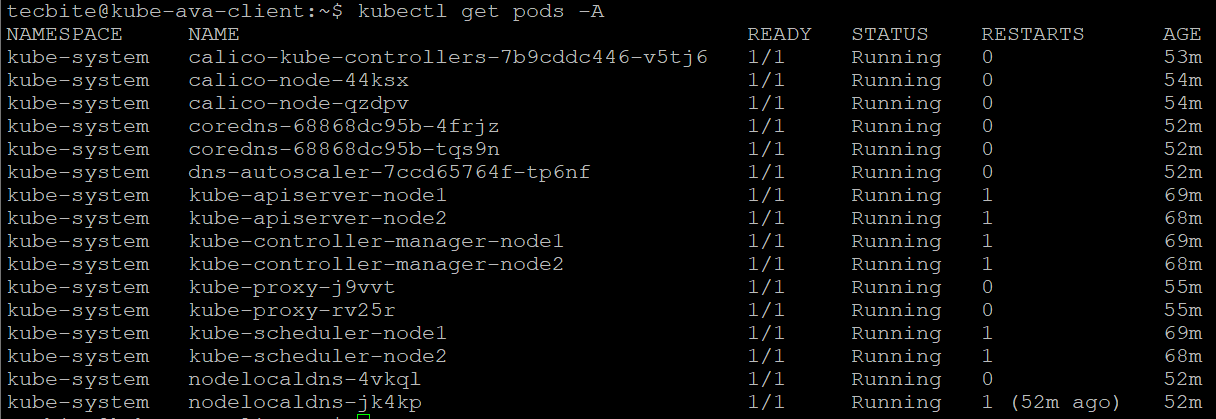
We are now able to administrate the cluster from our client:
Test pod deployment
To test our Kubernetes cluster, we can deploy a demo pod.
The following is a demo deployment which deploys an Ubuntu container:
tecbite@kube-ava-client:~$ vi demo-deployment.yaml
Paste the following declaration into it:
apiVersion: v1
kind: Pod
metadata:
  name: demo
spec:
  containers:
  - name: demo
    image: netreplica/ubuntu-host:latest
    command: ['/bin/bash']
    args: ['-c', 'lldpd; while true; do lldpcli show neighbors; sleep 1;done']
    securityContext:
      privileged: true
We can now use the following command to apply this configuration to the cluster:
tecbite@kube-ava-client:~$ kubectl apply -f demo-deployment.yaml

pod/demo created

To connect to the container, use the following command:
tecbite@kube-ava-client:~$ kubectl exec -it demo -- bash

root@demo:/#
This is the end of the installation and the configuration 😊. I hope this was a helpful instruction. Please leave a comment below if you have any questions.
– The Giant